
Today I'm continuing my series for photographers on shooting wedding reception details. If you haven't done so already, click below to get caught up!
Part 1: Pick the right detail
Part 2: Light
Part 3: Positioning
Picking a focal point is an important part of making your detail photos stellar. As in every type of photography, the focal point the photographer chooses is like a big sign saying -- "Look here! This is the most intriguing or interesting part of this scene, person or object."
Have you ever looked at photo, been drawn to a part of the image that is not in focus, and found yourself wishing that it was? It's a distracting, unsettling feeling, and can really leave your viewer unfulfilled. So I always tell aspiring photographers not to worry about everything in your detail photos being in focus, just make sure the right thing is. As long as the right thing is sharp in an image, it directs the viewer's eye, and the rest of the image that is soft informs it and brings context. Here are some examples when it comes to reception details.
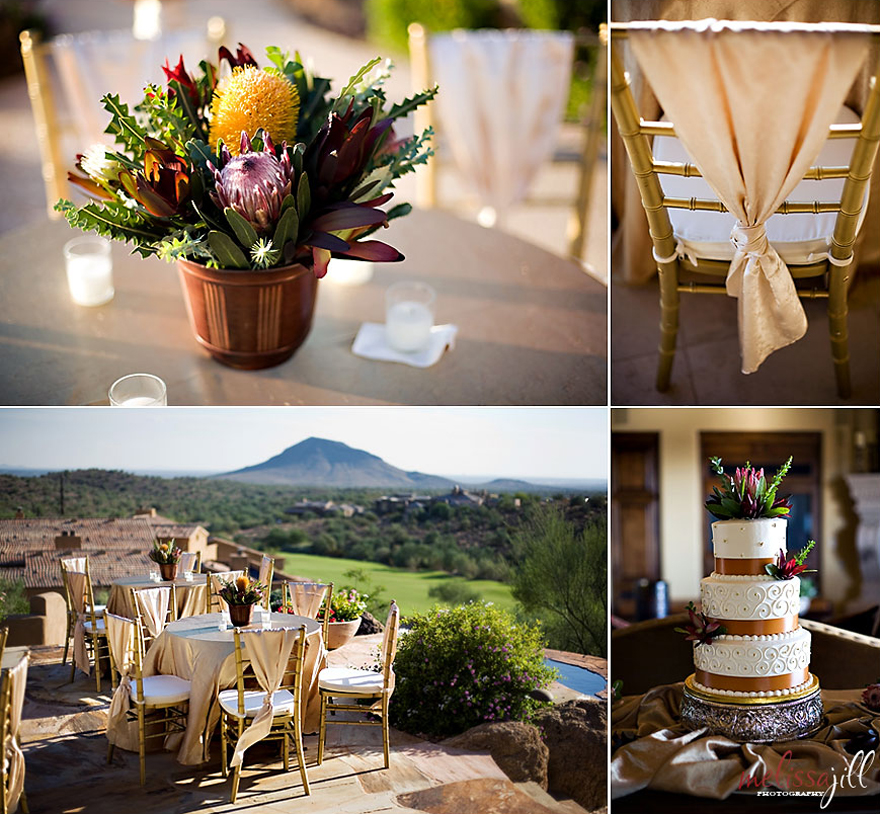
Look at the group of images at the top of this post. The bottom left image is a scene setting table shot from a backyard reception. Note that the only thing in the image that is perfectly sharp is the chair that is closest to me. The centerpiece isn't even in focus, but the image works. Your eye goes to the chair tie first, and then takes in the rest of the scene. Some photographers may prefer an image like this to have a larger depth of field. And that would work ok, too. It would just give the image a different feel -- less soft and romantic. So depth-of-field is really a subjective preference here, but my point is that you don't have to have everything in focus. As long as the right thing is in focus, the image can be powerful.
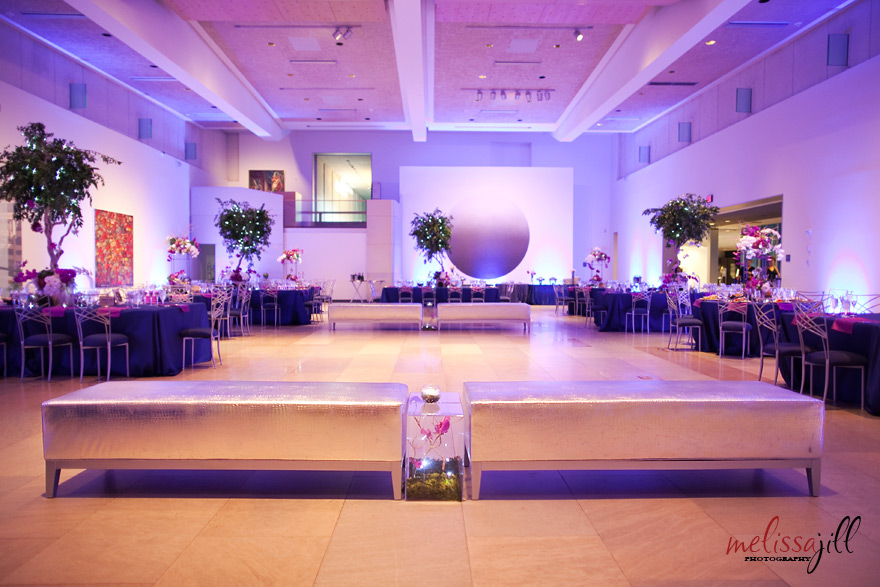
Here is another example. This next room shot could have a larger depth of field and be sharp clear through to the back of the room. But I just find photos with everything in focus stale and uninteresting. By choosing the benches in the foreground as my focal point, and allowing the rest of the room to fall slightly out of focus, I tell my viewer where to look. That doesn't mean that the rest of the objects behind the focal point are not important. They still inform the focal point and create context. When you look at this image, you don't think, "Oh, nice bench, but I wish I could see the rest of the room behind it better." At least I don't! The rest of the room looks stunning even out of focus, and the elements of the image work together to create a strong statement.
Part 1: Pick the right detail
Part 2: Light
Part 3: Positioning
Picking a focal point is an important part of making your detail photos stellar. As in every type of photography, the focal point the photographer chooses is like a big sign saying -- "Look here! This is the most intriguing or interesting part of this scene, person or object."
Have you ever looked at photo, been drawn to a part of the image that is not in focus, and found yourself wishing that it was? It's a distracting, unsettling feeling, and can really leave your viewer unfulfilled. So I always tell aspiring photographers not to worry about everything in your detail photos being in focus, just make sure the right thing is. As long as the right thing is sharp in an image, it directs the viewer's eye, and the rest of the image that is soft informs it and brings context. Here are some examples when it comes to reception details.
Look at the group of images at the top of this post. The bottom left image is a scene setting table shot from a backyard reception. Note that the only thing in the image that is perfectly sharp is the chair that is closest to me. The centerpiece isn't even in focus, but the image works. Your eye goes to the chair tie first, and then takes in the rest of the scene. Some photographers may prefer an image like this to have a larger depth of field. And that would work ok, too. It would just give the image a different feel -- less soft and romantic. So depth-of-field is really a subjective preference here, but my point is that you don't have to have everything in focus. As long as the right thing is in focus, the image can be powerful.
Here is another example. This next room shot could have a larger depth of field and be sharp clear through to the back of the room. But I just find photos with everything in focus stale and uninteresting. By choosing the benches in the foreground as my focal point, and allowing the rest of the room to fall slightly out of focus, I tell my viewer where to look. That doesn't mean that the rest of the objects behind the focal point are not important. They still inform the focal point and create context. When you look at this image, you don't think, "Oh, nice bench, but I wish I could see the rest of the room behind it better." At least I don't! The rest of the room looks stunning even out of focus, and the elements of the image work together to create a strong statement.
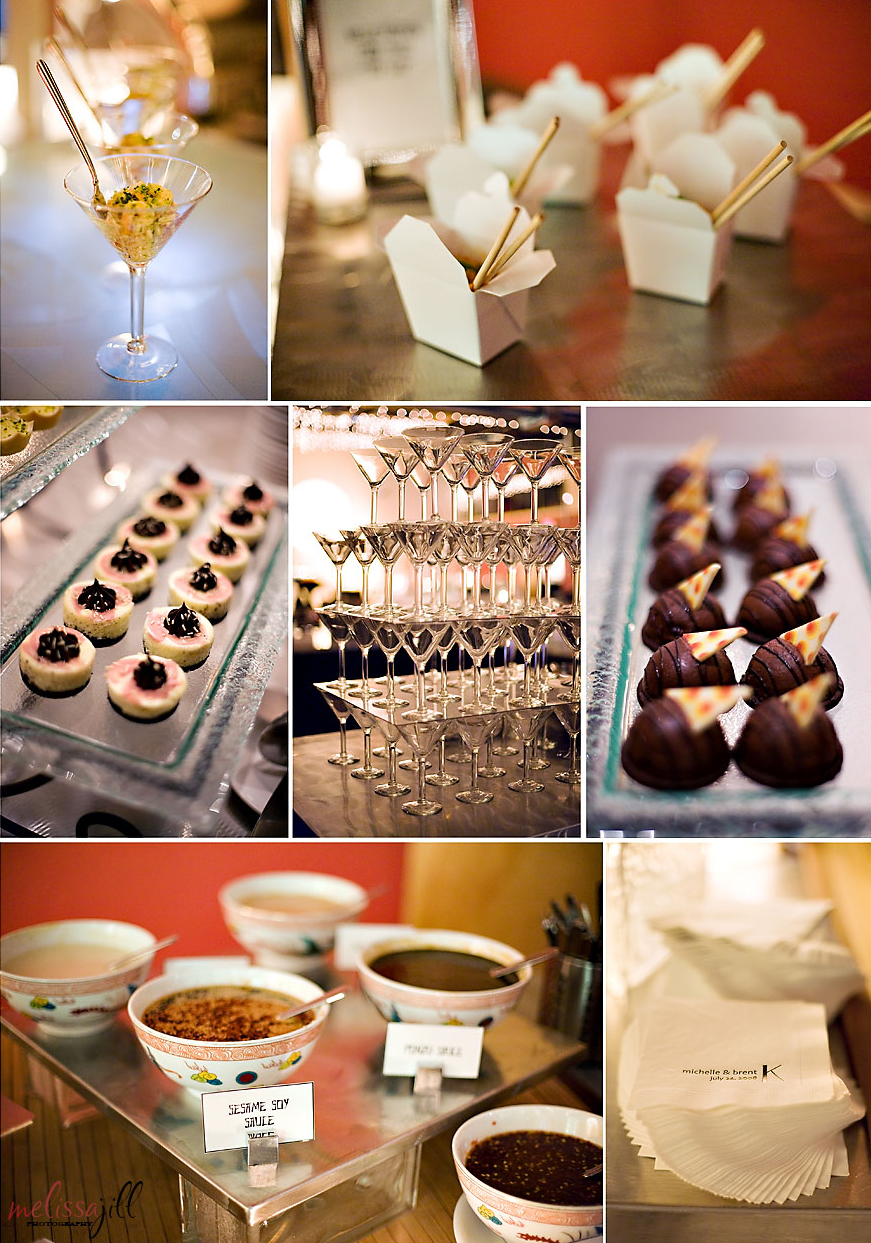
Details often come in multiples at a reception, and whenever I shoot a detail that is in a grouping or line with others like it, I either choose as my focal point the detail closest to me, or the 2nd in the line-up. Either option works for different contexts, but I often prefer picking the 2nd, because it allows me to then include the closest detail as a foreground element, creating depth in my image. Here are some examples:
In this next image grouping, when photographing the desserts, I focused on the 2nd in the line:
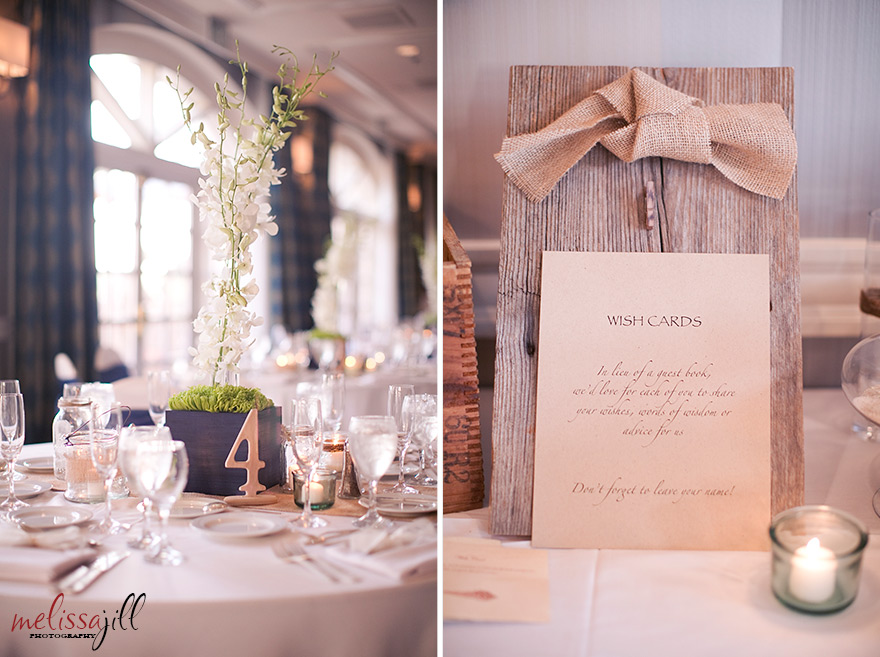
This next tip may seem obvious, but if there is any text or strong graphic elements in the scene you are photographing, it is best to focus on them. If you don't, the viewer will likely still be drawn to them and wish they were in focus. When it comes to reception details, this often applies to table numbers:
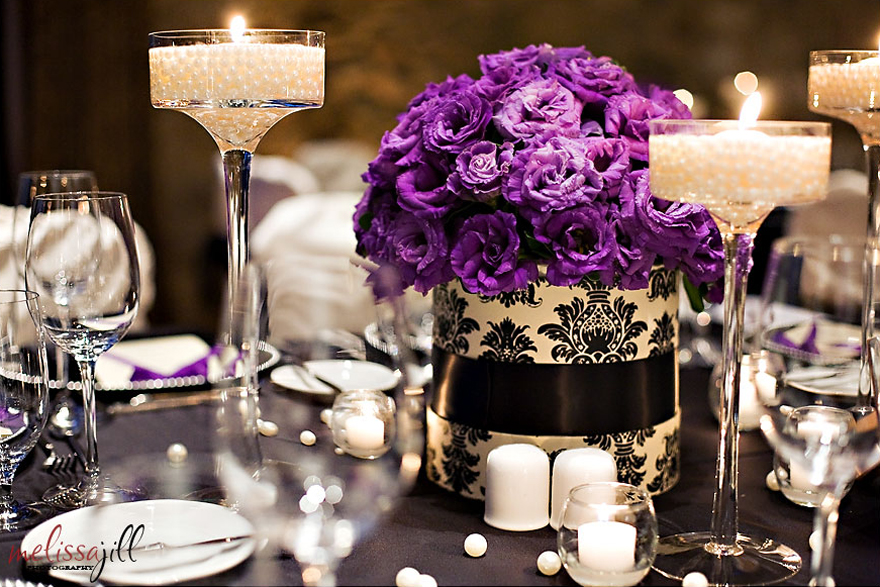
But it can also apply to other parts of the decor, like the base of this next centerpiece. Typically, I would focus on the flowers in a shot like this, but because of the graphic element in the base of the centerpiece, I chose to focus on it instead. In doing so, some of the flowers are slightly soft, but it still works, and is the best focal point choice considering the options.
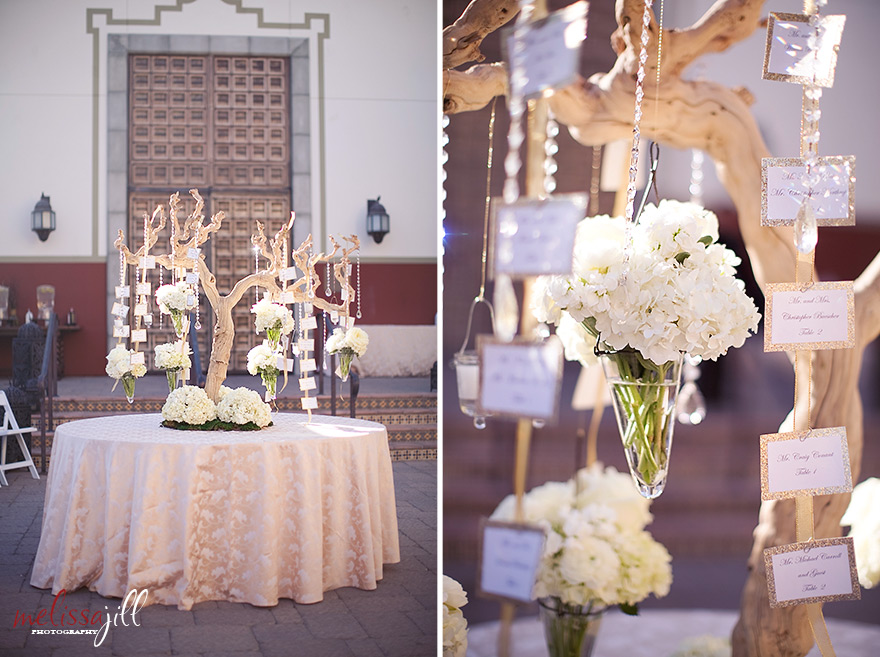
My final tip relating to focus when shooting reception details, is a trick I learned when trying to photograph tricky centerpieces like the one pictured below left. Sometimes details you want in focus are very small. And from the distance you need to stand in order to get the composition you want, the focal point box in your viewfinder is larger than the detail you want to focus on. If the box overlaps with something else in the shot at another distance from what you want in focus, it will sometimes lock onto the wrong thing. In this instance, try picking a larger surface to focus on that is equidistant from your camera. Taking the centerpiece below as an example, if I would have tried to focus on the top of it, I could have easily accidentally locked onto the door behind it. Instead I focused on the base of the centerpiece -- which offers a larger surface area -- and by getting it sharp, part of the top is also sharp.
I hope you found this post helpful! Stay tuned for the final installment of this series on photographing wedding reception details.
In the meantime, click here to find out about other resources I offer photographers! And click here to find out about my blog collage templates. I used them to combine details in this post into pretty combos and they are available for purchase if you want to make your blogging easier and faster!
Credits by image grouping (top to bottom):
1 -- Wedding Planner: Emily Edwards with Your Heart's Desire / Venue: Private residence in Fountain Hills, AZ / Florist: Tyler's Custom Design
2 -- Wedding Coordinator & Event Decor: Victoria Canada Weddings & Events / Venue: Phoenix Art Museum / Florist: Petal Pusher / Linens: Wildflower Linen / Cake: Sedona Cake Couture / Rentals: Classic Party Rentals
3 -- Venue: Montelucia Resort & Spa / Florist/Decor: Angelic Grove / Stationery: Celebrations in Paper / Cake: The Baked Equation
4 -- Wedding Planner: Jen Thye with Imoni Events / Venue: Four Seasons Scottsdale at Troon North / Florist & Decor: White House Flowers / Stationery: BeUBrides
5 -- Venue: Loft 19 / Caterer: Michael's Catering
6 -- Venue: Hilton Mission Bay San Diego / Florist: Exquisite Blooms
7 -- Venue: The Silverleaf Club / Florist/Decor: The Flower Studio
8 -- Venue: Montelucia Resort & Spa / Florist/Decor: Angelic Grove / Stationery: Celebrations in Paper
Click here to read the next part of the series!
Comments


